Welcome to my Website
Our collection of exquisite realism-style prints and artworks is perfect for collectors and gift-givers seeking one-of-a-kind masterpieces.
Main Page | Artist | Commission Info | Merchandise Info | Image Usage & License Info |
New Art




FREE Domestic first class Shipping on ALL Orders
from my Website.
International buyers on 8.5 x 11 (large prints) please contact me for shipping quote thank you.
My drawings , sketches, paintings are ALL HAND DRAWN .
My art can now be found in diamond paintings format at One With The Diamond Art One With The Diamond Art
I'm excited to announce i have joined the Eclipse Art Auctions collective
Psp Graphic tubes with my art now available at
Digital Art Heaven
Coloring Books "Flower Maidens" and "Woodland Fantasy"
Now available in Paperback coloring books at lulu.com
FAEsthetics Artists Collaboration:Coloring Books for Adults:
My Art Book available for Sale HERE
My 2026 Art Calendar
2026 Art Calendar now available at my zazzle store.
Visit my zazzle store
**NEW**
Coloring Pages Now available at my website
Coloring pages/PDFbooks
Feel free to join my FB coloring group
Katerina Art Coloring World
Please be patient as some of the
graphics may take a while to load up ~Thank you ~
Strathmore Vellum artist paper-
Graphite/Pencils (Sanford &Other brands)
Mechanical Pencils
Toilet Paper(don't laugh,works great for blending! ;) )
Other blending items.
Aluminol Foil
If you are going after a realism look ( or not in my opinion ) it's always good to use good reference for your artwork it will help you get proportions, lighting and so many other things right.You can find references as such from places like deviantart.com they provide one of the biggest stock material for artists.
For my Hands of Christ artwork i have used fellow artist and friend James Battersby as my model you can find James stock gallery at: http://elven-ghost.deviantart.com/
I'm sorry my step by step process pictures are a bit blurry and fuzzy, i used my digital camera instead of Scanning.

There are many ways you can carefully transfer your sketch to your good working surface,you can either set your TV on a dead channel or use your window or glass door anything that reflects light, take some masking tape and stick your sketch on the tv/window etc.. then place your good working paper over your sketch and carefully go over your sketch lines. Or if you don't mind spending a bit more you can buy a Light Box ,you can find small and affordable ones in art craft stores.

The most often question i get asked in my galleries/emails
is how do i get my shading/pencil work so smooth? It's always hard to explain in words pencil work,but i will do my best
In my opinion to achieve smooth pencil work a lot of layers of pencil work is needed, beginning shading with a light pencil like H2 and moving on to darker ones is one of the main keys to achieve smooth pencil work.I begin my shading/pencil work with an H2 pencil it has a hard lead but it's very light and i use it as a guide to shade in the darkest parts,i don't add any real pressure to the pencil at this point.I then move on to darker and softer lead pencils to get my shades/tones darker and gradually add pressure to my pencil.
Another most often question i get asked is how do i keep my pencil artworks clean and smudge free?Pencil can smudge easily to avoid this you can use a piece of aluminum foil (the wrap kind we use for kitchen/food purposes) place it under your hand and carefully continue on with your shading,you can also turn your drawing around when working to get to areas you need without smudging parts of the pencil work you completed.

I moved on to a 2B pencil and started some shading the hair.
When you shade try and keep your pencil strokes going in the direction of the shape of the subject you are shading.Feel free to hold your pencil any way you want to and feel comfortable with , in my opinion there isn't a "right " or " wrong " way to hold a pencil.

In this step I started shading the face with a 2B pencil ,with most of my artworks i always begin with the face/eyes,it's very important for me to get the eyes right, once i do, i can then move on to other parts of the artwork.
.Between my shading I sometimes use a piece of toiler paper (please do NOT use the -aloe or soft ones as they contain oils and may stain your paper) and blend a few pencil strokes very lightly if needed,and like a lot of artist i often use my fingers as blending tools but please make sure they are clean and don't have any oil residues.Other blending materials i use with my pencil artworks include:
make-up sponges (clean ones
Any type of cotton fabric which i cut in small pieces.
Paint Brushes (clean ones)
Q-tips
Just make sure not to blend too much as it may give you a faded look unless you are going after that look. I learned from trail and error, in the past i used to over blend my artworks and was afraid to press my pencil when it was needed, receiving good advice from fellow artists and practicing those fears slowly went away and I started adding more pressure to my pencil.

In this step i started work on the cloak/fabric.I started with an H2 and moved on to 2B then to 4B and then for the darkest areas to a 6B. It takes time and patience especially when shading clothes,fabric etc...

At this stage you can see the pencil work developing.

I don't often use mechanical pencils i love traditional pencils but mechanical pencils are great for little details and they don't need sharpening like regular pencils do.The Hands and fingers had a lot of details and i decided to use a mechanical pencil for some outline lines of the fingers and shading.I also keep close my kneaded eraser to erase any mistake or soften my pencil work,I love this kneaded eraser it's so soft and can be shaped in any shape and size you like :)
I have started work on the side of the cloak and hands again in the same manner as described above start shading with a H2 and moving on to darker leads.

Here is an overview of my working area,and some of my pencils while i was working on this artwork. I recently bought a self healing protective mat that is meant for protecting desk surfaces when drawing painting etc,,..I love it. You can even use it as a cutting board and cut paper and the mat will self-heal on it's own.
I kept working building up layer by layer slowly,the background was achieved with black charcoal which i blended with toilet paper and to give it a cloudy effect i used a q-tip.I love using charcoal for my backgrounds it gives you fantastic effects.
And this is the finished artwork....
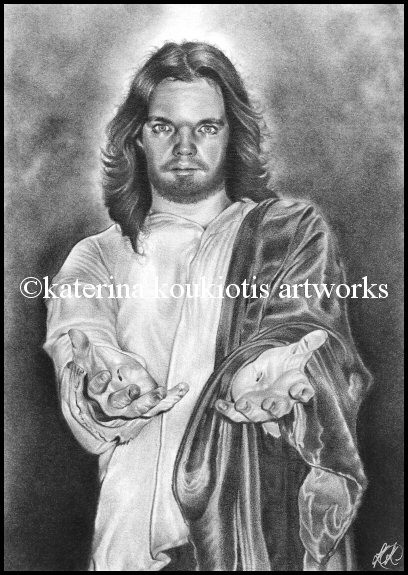
There isn't really any magic trick to that the only thing that is needed is patience when it comes to pencil work. A pencil artwork can take me from 1- to 3 days to finish sometimes even longer if the subject is difficult or complex.I know it can get boring sometimes working on the same artwork for a long time but i guarantee you the end results will be most satisfying :)
This pencil tutorial is copyrighted to katerina koukiotis katerinaart.com